# NEAT Stack: Create a Static Website with Netlify CMS, Eleventy, AlpineJS & TailwindCSS
In this article, I will explain how you can create a static website with NEAT Stack and setup CMS to edit the content.
## What is NEAT Stack?
A NEAT Stack is a way of creating static websites with following tools.
#### [Netlify CMS](https://www.netlifycms.org/)
Netlify CMS is used to handle the CMS part of this static website. It uses `git` as backend so there is no need to maintain a different server. Maintained by the awesome folks at Netlify.
#### [Eleventy](https://www.11ty.dev/)
Eleventy is a simpler static site generator using javascript. Eleventy will compile all of our files and generate a static output where we can host it anywhere.
#### [Alpine.js](https://github.com/alpinejs/alpine)
Alpine JS is a minimal framework to provide JavaScript behavior in our markup. Think it as a lite version of React & Vue. We use Alpine JS to add JavaScript components like Dropdown, Toggle etc.
#### [Tailwind CSS](https://tailwindcss.com/)
Tailwind CSS is a utility first CSS Framework. It has a set of preset utility classes to style anything without touching CSS file. I have wrote an in-depth [article on TailwindCSS](https://blog.surjithctly.in/bootstrap-or-tailwindcss-how-to-decide-a-framework-for-your-next-project) , Be sure to read it for more information.
## Installation
Setting up a project is the most time-consuming part. However getting started with NEAT Stack is now easy because of the following Starter Template. (its written by me 😊)
Github: https://github.com/surjithctly/neat-starter
### Step 1
Open your favorite terminal in your Work folder and run the following command.
```bash
git clone https://github.com/surjithctly/neat-starter.git your-project-name
```
### Step 2
Now navigate to the directory
```bash
cd your-project-name
```
### Step 3
Now install the dependencies using the following command
```bash
npm install
```
You may also use `yarn install` if you are using Yarn as a package manager.
### Step 4
Now the next step is to build the project for the first time so that it copies all required files.
```bash
npm run build
```
### Step 5
Now Run Eleventy to create a server and to start local development.
```bash
npm run start
```
If you have done everything as instructed above, you'll be able to see the following page in your `localhost` server
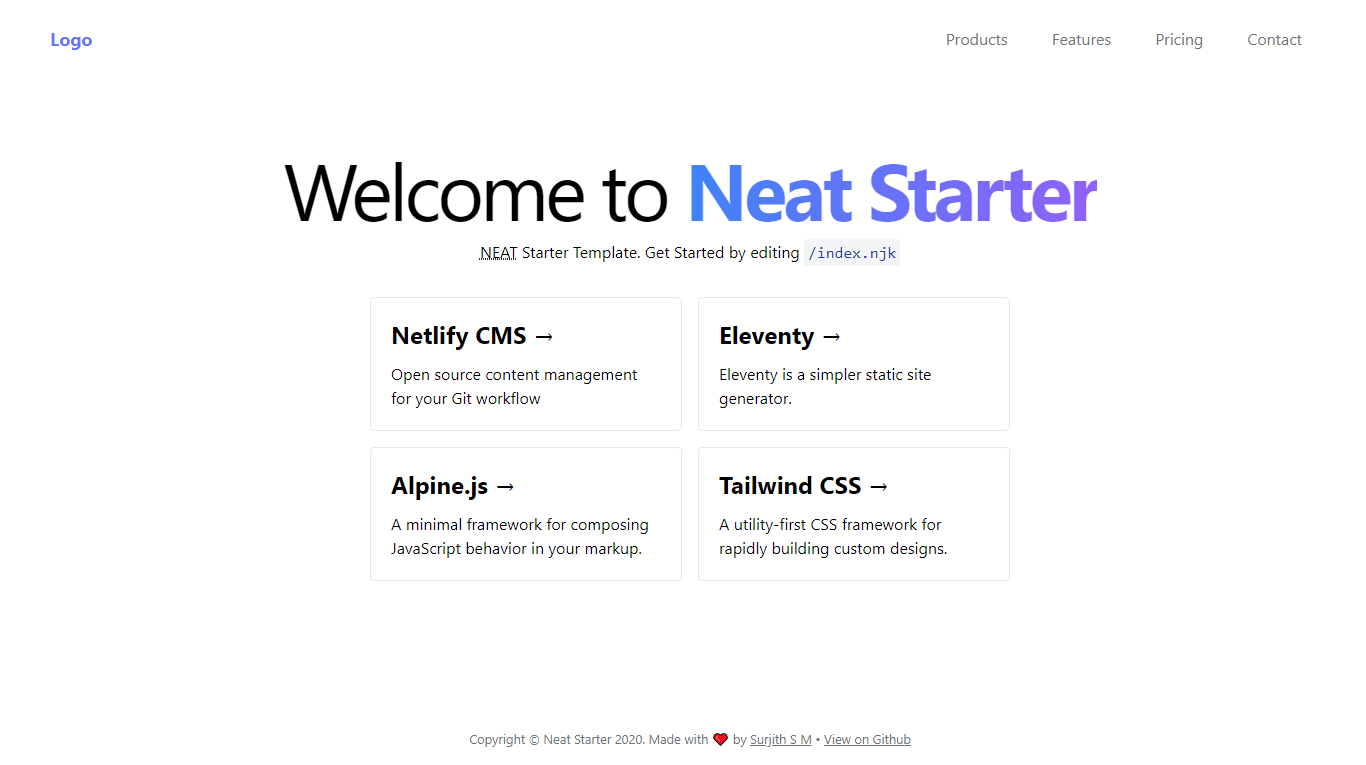
[Live Demo](http://neat-starter.netlify.app/)
## Folder Structure
Root `/` folder of our project contains all configuration files like `tailwind.config.js`, `.eleventy.js` etc..
`/src` folder contains all of our site contents and data. Before configuring anything, lets go to the `/src` folder and make some changes to see if its working.
## Make Changes
Go to the `/src` folder and open `index.html` file in your favorite code editor (My favorite is VSCode). Now make any changes and save it to see if the changes are reloading or not. If its reloading with your changes, then it means its working perfectly. If you have any issues, comment here or raise an issue in the github.
## Nunjucks
Writing code with NEAT Stack is fun because of [Nunjucks](https://mozilla.github.io/nunjucks/) . Eleventy supports Nunjucks Templating language by default. So that you can split HTML Code and avoid writing repetitive code like a boss.
Including a part of HTML is easy. Go to `src/_includes/partials/navbar.html` and make some changes there. Now we can include the navbar anywhere we wanted using `{% include ..}`
Another great feature of Nunjucks is the Loops. Suppose you have a card block repeating over 10 times, using Nunjucks, just write it once and loop it. means you will be able to modify easily by changing in one place. The data should be seperated here and It will be handled seamlessly by our Eleventy.
Example Nunjucks loop
`_data/navigation.yml`
```yaml
items:
- text: Menu One
url: "#"
- text: Menu Two
url: "#"
- text: Menu Three
url: "#"
```
`navbar.html`
```html
```
That's it. Adding classes or modifying layout is now easier since Eleventy & Nunjucks combined do all the magic for us.
## Eleventy Data
Since we talked about the _data above, Its important to know that splitting our code from data helps us to easily modify it using our Netlify CMS. If you enter the data as raw text inside a page, it means you cannot edit that text using CMS. So its important to plan initially according to your needs. Make an list on which data you need to change later and which is not.
By default, Eleventy looks for a folder called `_data/` and get the data from the files inside. They accept `json`, `yaml`, `js` etc. So you can write data in any format you like. If you have to fetch a data from a different server, you can create `.js` file which returns the data.
> The `_data` folder name can be changed using Eleventy configuration
## Writing HTML
Its really simple to create pages or sections in Eleventy. Just create an HTML file in the /src folder and it will automatically build it as a page. If you are using Nunjucks, you can also create filename with `.njk` extension. If you are writing a blog, you can even use markdown `.md` as well.
## Tailwind CSS
Nothing much to talk about TailwindCSS, just add classes as you normally would with any TailwindCSS Projects. If you are new to TailwindCSS, Checkout their website & docs to know more details. (Spoiler Alert: Its awesome!)
## Alpine JS
Adding interactivity is easy using Alpine JS. You can learn more about from the docs. Here's how a simple Toggle works with Alpine JS.
```html
```
Here you can see the initial data is created for `isOpen` and its set to `false` and it changes the data on button `click`. Based on the Value, we just toggle the `div` visibility. Wasn't it easy compared to jQuery? We didn't even created a `js` file.
## Netlify CMS
To setup Netlify CMS, first you need to connect the project to git. If you haven't already, `git init` to setup Git and Push to your favorite repository like Github or Gitlab.
By default, Netlify CMS looks for `/admin` folder and it should contain a Page (eg: `index.html`) and `config.yml` file.
Index page should import the Netlify CMS script from their repo. Our Starter template already includes everything, so you don't need to do this manually.
```html
```
Now, coming to the `config.yml`, we need to setup all configuration options here.
First of all, we need to choose which Authentication we are using for the CMS. If you are using Netlify to host website, you can use it otherwise just use the `github` Auth.
```yml
# Netlify Auth
backend:
name: git-gateway
# Github Auth
backend:
name: github
```
If you want to test the CMS locally, install Proxy Server using the following command.
```bash
npx netlify-cms-proxy-server
```
Now in `config.yml`, make sure local backend is enabled.
```yml
local_backend: true
```
Now `admin` can be accessed from `localhost:PORT/admin`
> make sure to run both Eleventy Server & Proxy Server parallelly (using multiple terminal windows)
The next step is to create collections based on our data. There is a [well explained docs](https://www.netlifycms.org/docs/intro/) in their website. So I'm not repeating it here.
## Hosting
Once you finished your project, run `npm run build` and it will create a folder called `_site` containing all static generated files. Just upload this anywhere you like.
However, to make use of CMS, Try to upload in a server with Continuous integration with Git. The obvious option is [Netlify](https://www.netlify.com/) or [Vercel](https://vercel.com/). You can also host it on Github Pages or any other places you wish.
## Conclusion
That's all folks. This is one of the modern way to create a static website. One thing to mention here is you are free to change the tools used as per your requirements. There is no requirement to use both four tools. Don't like Tailwind? use any other. Don't like AlpineJS? That's fine too. Don't plan to add CMS? Skip that. Its all based on your needs and requirements.
Questions? Suggestions? Comment below.
If you haven't already, [Follow me on Twitter](https://twitter.com/surjithctly).