


There are many Headless CMS out there, From that Sanity CMS is what I liked to pair with Next.js because of three main reasons.
First, the schema & the UI is completely controlled by the code so that we can customize it in any way we like. There are no restrictions. They are using react for their UI, so we can customize it as we like. In case of other CMS, we have to stick with their UI & only use whatever option they provides.
Second, The Admin UI can be completely hosted anywhere we like and it will communicate with the main server in real-time. While using another CMS like DatoCMS or Contentful, we have to open their website and login to access our website content. But in Sanity, we can host the Admin in our server itself.
See an example on how it might looks like:
Without Sanity
Website: https://web3forms.com/

Admin: https://username.someothercms.com/dashboard/manage
With Sanity
Website: https://web3forms.com/

Admin: https://web3forms.com/studio
How cool is that. When doing projects for clients, this will be a main turning point. In my knowledge this feature is only providing by Sanity CMS & Netlify CMS.
Third reason I like sanity is because its beautiful design. I have played around with some other CMS, when the design is good, the pricing keeps us away. But I liked the UI Design of Sanity along with a better Pricing, This is of course a personal opinion.
So, without wasting much time, let's dive in.
Setting up Next.js & Tailwind
This is pretty straight forward, also there are many tutorials available. So I won't get deep, but I have also made a starter template which you can use to save time.
Next.js & TailwindCSS Starter Template
First step is to install Next.js with their bootstrap template called "Create Next App". If you want an in depth tutorial, visit: Next.js Docs
npx create-next-app
# or
yarn create next-app
Now we can install TailwindCSS. This also easy. Follow the steps below or checkout the official docs here: Install TailwindCSS with Next.js
npm install tailwindcss postcss autoprefixer
# or
yarn add tailwindcss postcss autoprefixer
Now Generate your Configuration file.
npx tailwindcss init -p
This will create a minimal tailwind.config.js file and postcss.config.js at the root of your project. Make sure you add purge settings to remove unused classes from production build.
Now add TailwindCSS file eg: /styles/tailwind.css
@tailwind base;
@tailwind components;
@tailwind utilities;
Then you can include the CSS in pages/_app.js
That's it! Done! now run the following command to see if everything working. You should be able to see it live on http://localhost:3000
Setting up Sanity CMS
The first step is to install Sanity CLI globally. use the following command to do that.
npm install -g @sanity/cli
Now, go to the root folder of your created next.js app, and run the following command.
sanity init
The above command will walk you through some steps to create / login to an account, creating a project, set up the dataset, generate the files, etc.

The only thing to consider is when it ask to choose a folder name, make sure its in the root folder of next.js and name it as something like studio or admin
Now, the folder will create in the root of Next.js project.
Setup Admin Path
To setup the admin path as /studio or /admin as I mentioned in the intro, you have to configure some steps. Go to next.config.js (or create one) and add the following code.
const STUDIO_REWRITE = {
  source: "/studio/:path*",
  destination:
    process.env.NODE_ENV === "development"
      ? "http://localhost:3333/studio/:path*"
      : "/studio/index.html",
};

module.exports = {
  rewrites: () => [STUDIO_REWRITE],
};
You may change the word studio to admin if you like. This uses Next.js rewrite function so that we don't need to browse separate URL.
Also, make sure you update the basepath in studio/sanity.json so that the dependencies resolves correctly.
  "project": {
    "name": "Your Sanity Project",
    "basePath": "/studio"
  },
Setup CORS
If you are doing the step above, you must allow CORS origin from the Sanity Project Settings. Go to: https://manage.sanity.io/projects/{project_id}/settings/api
Project ID can be found in /studio/sanity.json
Now, click on ADD ORIGIN button on the page and add your URL & Enable "Allow Credentials" checkbox.
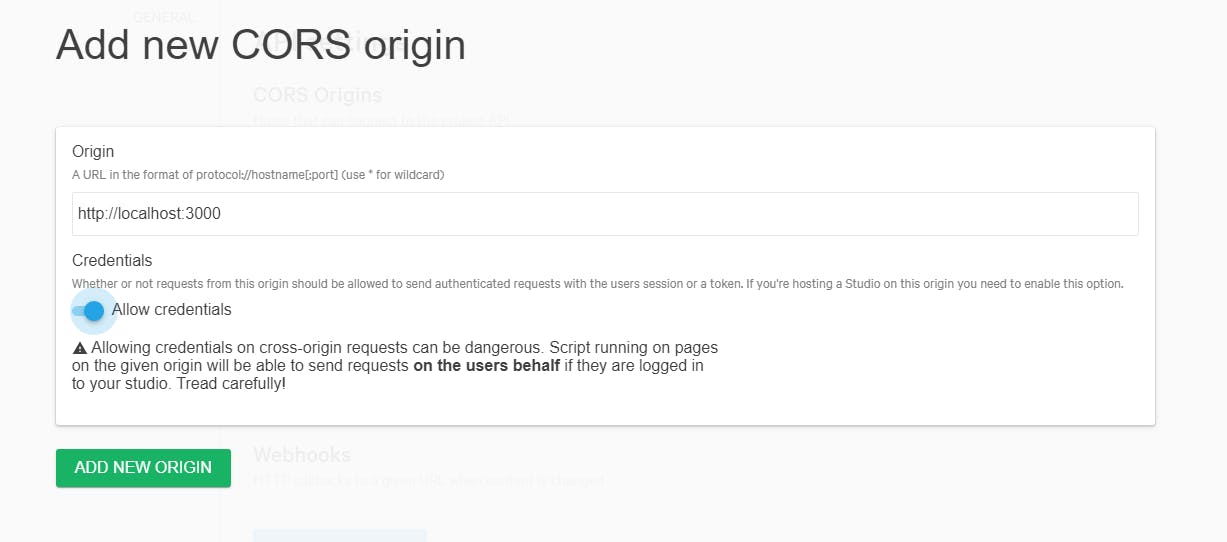
Since I run Next.js on port 3000 on localhost, I'm using that URL, You can also add the Production URL in same way.
Configure Development Server
The next step is to run both Sanity & Next.js Together. For that, we have to do some steps.
- Install Concurrently Plugin
npm install -g concurrently
# or
yarn add -g concurrently
Now, open your package.json and change your build script like this.
  "scripts": {
    "dev": "concurrently \"next dev\" \"cd studio && sanity start\"",
    "build": "echo 'Building Sanity to public/studio…' && cd studio && sanity build ../public/studio -y && cd .. && cross-env NODE_ENV=production next build",
    "start": "next start"
  },
This will make sure Next.js & Sanity runs & build together.
Add .env for Sanity
You have to add a .env file to add the project ID. Use the following:
# For Studio Locally
SANITY_STUDIO_API_PROJECT_ID = "PROJECT_ID"
SANITY_STUDIO_API_DATASET = "production"

# For Next Locally
NEXT_PUBLIC_SANITY_PROJECT_ID = "PROJECT_ID"
NEXT_PUBLIC_SANITY_DATASET = "production"
Make sure your env name is .env and not .env.local or you will spend countless hours debugging the issue like me 😀
Setup Next Sanity Plugin
Now, we need to install one last plugin which is called next-sanity. This plugin is needed so that we can call the API easily. The plugin will handle the rest.
npm install next-sanity
# or
yarn add next-sanity
Now, create a file called sanity.js in /utils folder in the root of our project. This will be file communicating with the plugin. (Code taken from the next-sanity repo). No changes need in the below file, Just copy-paste and save.
import {
  groq,
  createClient,
  createImageUrlBuilder,
  createPortableTextComponent,
  createPreviewSubscriptionHook,
  createCurrentUserHook,
} from "next-sanity";

const config = {
  /**
   * Find your project ID and dataset in `sanity.json` in your studio project.
   * These are considered “public”, but you can use environment variables
   * if you want differ between local dev and production.
   *
   * https://nextjs.org/docs/basic-features/environment-variables
   **/
  dataset: process.env.NEXT_PUBLIC_SANITY_DATASET || "production",
  projectId: process.env.NEXT_PUBLIC_SANITY_PROJECT_ID,
  useCdn: process.env.NODE_ENV === "production",
  /**
   * Set useCdn to `false` if your application require the freshest possible
   * data always (potentially slightly slower and a bit more expensive).
   * Authenticated request (like preview) will always bypass the CDN
   **/
};

/**
 * Set up a helper function for generating Image URLs with only the asset reference data in your documents.
 * Read more: https://www.sanity.io/docs/image-url
 **/
export const urlFor = (source) => createImageUrlBuilder(config).image(source);

// Set up the live preview subsscription hook
export const usePreviewSubscription = createPreviewSubscriptionHook(config);

// Set up Portable Text serialization
export const PortableText = createPortableTextComponent({
  ...config,
  // Serializers passed to @sanity/block-content-to-react
  // (https://github.com/sanity-io/block-content-to-react)
  serializers: {},
});

// Set up the client for fetching data in the getProps page functions
export const sanityClient = createClient(config);
// Set up a preview client with serverless authentication for drafts
export const previewClient = createClient({
  ...config,
  useCdn: false,
  token: process.env.SANITY_API_TOKEN,
});

// Helper function for easily switching between normal client and preview client
export const getClient = (usePreview) =>
  usePreview ? previewClient : sanityClient;

// Helper function for using the current logged in user account
export const useCurrentUser = createCurrentUserHook(config);
Creating the Schema
Now, open the /studio/schemas/schema.js file and add a sample schema. More details about this can be found on Sanity Docs
Here I am adding a sample schema called "Settings"
// First, we must import the schema creator
import createSchema from "part:@sanity/base/schema-creator";

// Then import schema types from any plugins that might expose them
import schemaTypes from "all:part:@sanity/base/schema-type";

// Then we give our schema to the builder and provide the result to Sanity
export default createSchema({
  // We name our schema
  name: "default",
  // Then proceed to concatenate our document type
  // to the ones provided by any plugins that are installed
  types: schemaTypes.concat([
    /* Your types here! */
    {
      title: "Settings",
      name: "settings",
      type: "document",
      fields: [
        {
          title: "Website Name",
          name: "name",
          type: "string",
        },
      ],
    },
  ]),
});
Don't fret, we only need to add schema inside the types, the rest of the code is already there for us. Pretty neat!
Making it Singleton (one-off)
Since the example I have shown above is for singleton document type, which means we only need to add this once, not repeatable like Blog Articles. We need some more configuration to do that.
Skip this step if you don't plan to use singleton.
This is the only thing I hate about Sanity right now, there is no easy way to make a singleton document. Its bit long route (As of Jan 2021). Hope they fix this in their future update.
So to make a singleton document, we have to create a file called "deskStructure.js". It will contain code something like this:
import S from "@sanity/desk-tool/structure-builder";

const hiddenDocTypes = (listItem) => !["settings"].includes(listItem.getId());

export default () =>
  S.list()
    .title("Content")
    .items([
      S.listItem()
        .title("Site settings")
        .child(S.document().schemaType("settings").documentId("settings")),
      // Add a visual divider (optional)
      S.divider(),
      // List out the rest of the document types, but filter out the config type
      ...S.documentTypeListItems().filter(hiddenDocTypes),
    ]);
Read more about Structure Builder on Sanity Docs
Now, we need to add the path in sanity.json. Open the file and add these lines.
 "parts": [{
      "name": "part:@sanity/base/schema",
      "path": "./schemas/schema"
    },
    {
      "name": "part:@sanity/desk-tool/structure",
      "path": "./deskStructure.js"
    }
  ]
That's it, we are good to go now.
Adding Content in Sanity CMS
Its the time to add a sample content to our Database. Run the following command to start Next.js & Sanity together:
npm run dev
# or
yarn dev
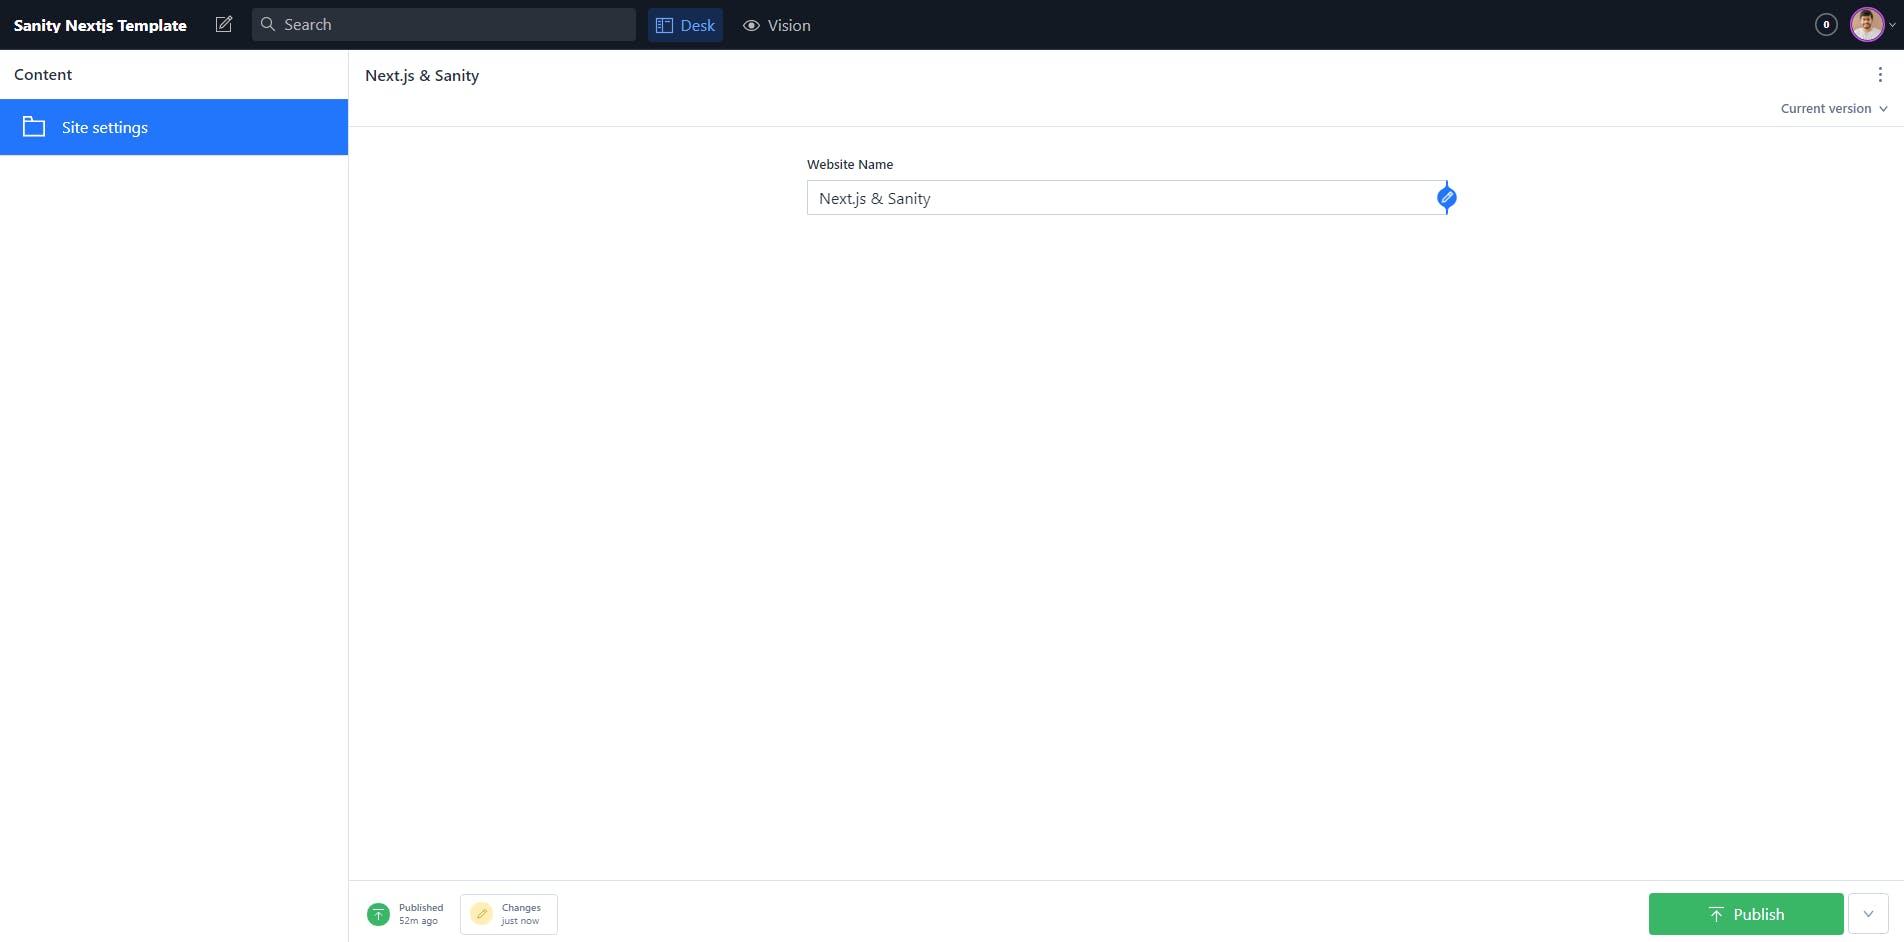
Then open http://localhost:3000/studio
🥳 Our Sanity Studio is live (if followed the steps correctly), Now login to your sanity account (I prefer Github Login). Once logged it, click on our newly created type "Site settings" and add a sample content by clicking it.
Getting the data in Next.js
Now comes the final part, getting sanity content inside our next.js page. for that there are some steps. Please follow along.
First, you need to know the query language called groq. That's what sanity is using by default. Also they do provide an option for graphql.
Import Next Sanity & utils/sanity in our next Page. In this case I'm using index.js.
import { groq } from "next-sanity";
import { getClient } from "../utils/sanity";

const query = groq`*[_type == "settings"]{
  name,
  _updatedAt,
}`;
Now in the bottom of the page, also add the following code to get the data
export async function getStaticProps() {
  let response = await getClient().fetch(query);

  return {
    props: {
      settings: response || null,
    },
    revalidate: 5,
  };
}
Now we will be able to call this props in our function like this:
export default function Home(props) {
  const settings = props.settings[0];
  return (
    Welcome to {settings.name}
  );
}
🥂🥳 Yaaaayyy!!! That's it. Now refresh your browser and see your data.
Hope this tutorial helps you get started. Don't forget to checkout the Sanity Docs for more information & help. They also have some nice starter templates.
If you have any questions or feedback, comment below